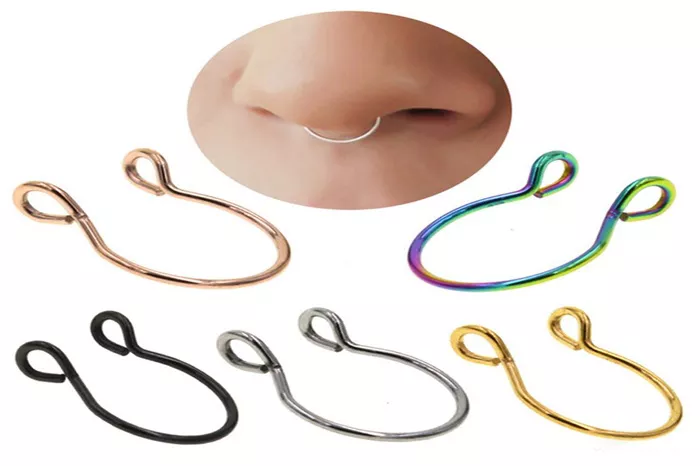
Inserting a U-shaped nose stud may seem daunting, but with the right technique, it can be done smoothly and comfortably. A U-shaped nose stud, often chosen for its sleek, minimalist design, is a popular option for nostril piercings. To ensure a secure fit and minimize the risk of infection or irritation, it’s important to follow a proper insertion process and adhere to aftercare guidelines. This step-by-step guide will help you insert your U-shaped nose stud with ease and confidence.
Preparation
Before inserting your U-shaped nose stud, proper preparation is essential to ensure the process is clean and hygienic.
Clean the Jewelry and Piercing Site
Sterilize the stud: Clean the U-shaped nose stud thoroughly with an antiseptic solution or saline solution to remove any dust or bacteria.
Clean the Piercing Site: Use a saline solution or an antiseptic wipe to gently clean the area around the piercing. This helps reduce the risk of infection and ensures the skin is free from any dirt or bacteria.
Wash Your Hands
Thoroughly wash your hands with soap and water before handling your jewelry or touching the piercing area to prevent contamination.
Positioning and Orientation
Proper positioning of the U-shaped stud is crucial for a smooth insertion and a comfortable fit.
Align the Curved Part
The curved part of the U-shaped stud should align with the natural curve of your nostril. This helps the stud sit securely and comfortably in place.
Hold the Stud Properly
Hold the stud by its decorative end, ensuring that you do not touch the piercing hole with your fingers to avoid transferring dirt or bacteria.
Insertion Technique
Prepare for Insertion
Gently hold the stud by the decorative end, keeping the straight part ready to go into the piercing hole.
Insert the Straight End
Gently insert the straight end of the stud into the piercing hole. Be careful not to force it through—if there’s any resistance, pause and gently reposition the stud.
Follow the Curve
Once the straight part of the stud is through, gently rotate the stud to follow the U-shape. The curved part should naturally guide itself through the hole, fitting comfortably along the contour of your nostril.
Ensure a Secure Fit
Once the stud is through, gently adjust the U-shaped end so that it sits flush against the inside of the nostril. Ensure that it feels comfortable, and that it stays securely in place without being too tight or loose.
Ensuring Comfort and Fit
Once the U-shaped nose stud is inserted, it’s important to check for comfort and ensure a secure fit:
Adjust for Comfort
Gently press the stud to ensure it’s seated comfortably inside your nostril. You should feel a slight pressure but no pain. If the stud feels tight or too loose, adjustments may be necessary.
Resizing Options
If the stud feels too tight or uncomfortable, it may be helpful to resize the jewelry. If you are unsure about resizing, consult a professional piercer for assistance.
Aftercare
Proper aftercare is critical for healing and preventing infection after insertion.
Clean the Piercing
Regularly clean the piercing with a saline solution, especially in the first few weeks after insertion. Avoid using alcohol or hydrogen peroxide, as these can irritate the piercing.
Avoid Touching the Stud
Refrain from touching or twisting the stud unnecessarily. Touching the piercing with unwashed hands can introduce bacteria, leading to infection.
Signs of Infection
Monitor the area for signs of infection, such as redness, swelling, excessive pain, or discharge. If you notice any of these symptoms, consult a professional piercer or healthcare provider.
Be Patient
Piercings typically take several weeks to heal. Be patient and continue with your aftercare routine to ensure the best healing process.
Troubleshooting
While inserting a U-shaped nose stud is relatively straightforward, there are a few common issues you may encounter:
Swelling or Irritation
If you experience swelling or irritation, apply a saline solution compress to the area for relief. Avoid sleeping on the side of the piercing to reduce pressure and irritation.
Difficulty in Insertion
If you encounter difficulty inserting the stud, make sure that the piercing hole is fully healed. If the stud doesn’t fit, try using a smaller gauge stud, or consult a professional piercer for assistance.
Consulting a Professional
If you’re having difficulty with insertion or are concerned about the fit, it’s always a good idea to seek assistance from a professional piercer who can guide you through the process or provide further advice.
Conclusion
Inserting a U-shaped nose stud can be a simple and rewarding process when done correctly. By following the preparation, positioning, and insertion techniques outlined in this guide, you can ensure a comfortable and secure fit for your new jewelry. Be sure to maintain a diligent aftercare routine to promote healing and prevent infection. If you’re ever in doubt or encounter issues, don’t hesitate to consult a professional piercer for guidance.
Related topics:

