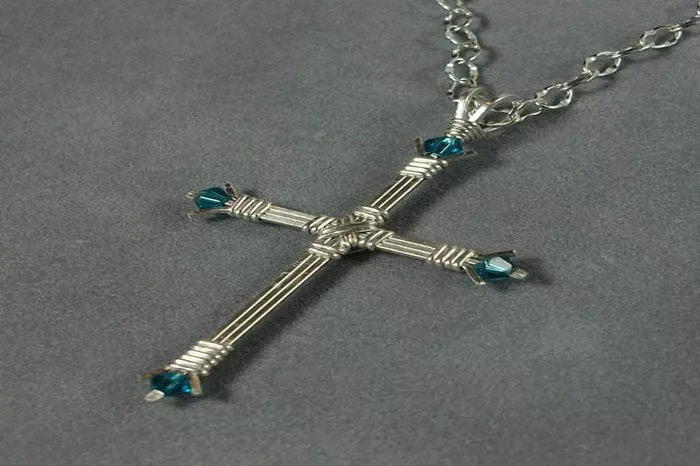
Creating a wire cross necklace is a rewarding DIY project that combines creativity and craftsmanship. Whether you’re a beginner or an experienced jewelry maker, this step-by-step guide will walk you through everything you need to know to create your own custom wire cross necklace. From the materials to the finishing touches, this article will help you craft a beautiful, personalized piece of jewelry.
Materials Needed
Before you begin, gather the necessary materials. Here’s a comprehensive list of everything you’ll need:
Wire
20-gauge wire is ideal for creating the cross shape. It’s sturdy yet pliable enough for bending.
You may also want to use thinner wire (22- or 24-gauge) for decorative wrapping or adding beads.
Pliers
- Round-nose pliers
- Flat-nose pliers
- Wire cutters
Chain
A necklace chain that suits your desired length and style. Options include a cable chain, snake chain, or leather cord for a more rustic look.
Beads or Charms
For added decoration, consider using small beads or charms that you can wire onto the cross.
Tools Required
To ensure a smooth crafting process, you’ll need the following tools:
Round-Nose Pliers
For forming loops and gentle curves in the wire.
Flat-Nose Pliers
For bending the wire at right angles and securing the cross shape.
Wire Cutters
To trim the wire to the appropriate lengths.
Ruler or Measuring Tape
To measure wire lengths accurately.
Work Surface
A flat surface to lay out the design and work safely.
Bead Board
For arranging decorative elements before attaching them to the wire.
Step-by-Step Instructions
Creating the Cross
Step 1: Measure and cut four pieces of wire
Two pieces for the vertical and horizontal arms of the cross (approximately 3 inches each).
Two pieces for the horizontal and vertical portions of the intersection (about 2 inches each).
Step 2: Begin with the vertical wire piece. Using your flat-nose pliers, bend the wire at a right angle about 1.5 inches from one end, creating the top section of the cross.
Step 3: Now, take the horizontal wire piece and position it perpendicularly to the vertical wire. Use your flat-nose pliers to bend each end of the horizontal wire around the vertical wire, creating the intersection of the cross.
Step 4: Secure the intersection by gently twisting the ends of the horizontal wire around the vertical wire, forming a tight connection. Repeat the same for the other side of the horizontal piece.
Step 5: Use the round-nose pliers to create small loops at the ends of the wire pieces for a finished look, and secure any loose ends with the flat-nose pliers.
Adding Decorative Elements
Step 1: If you wish to add beads or other decorative elements, thread them onto the wire before securing the ends. You can add a few small beads to the arms of the cross for a touch of elegance.
Step 2: Use the round-nose pliers to form small loops to secure beads at both ends of each arm. This will keep the beads in place and add a finished touch to the cross design.
Finishing Touches
Step 1: At the top of the vertical wire, use the round-nose pliers to bend the wire into a small loop. This loop will be used to attach the cross to the necklace chain.
Step 2: Trim any excess wire with the wire cutters and tuck any sharp ends under using the flat-nose pliers to avoid irritation or injury.
Assembly of the Necklace
Attaching the Cross Pendant
Step 1: Open a jump ring using your flat-nose pliers and thread it through the loop at the top of the wire cross.
Step 2: Attach the jump ring to the necklace chain and close it securely. If you’re using a clasp, thread the ends of the chain through the clasp and close them.
Adjusting the Chain Length
Step 1: To adjust the chain length, use wire cutters to trim the chain to your desired size. Add a jump ring or clasp at the cut end if necessary.
Step 2: Ensure the chain fits comfortably around your neck, and adjust accordingly.
Tips and Techniques
Practice Makes Perfect: If you’re new to wire bending, practice on scrap pieces of wire before starting on your final piece.
Smooth Edges: Always check for any sharp or rough edges after cutting the wire. Use your flat-nose pliers to carefully tuck them in to avoid injury.
Wire Selection: When choosing wire, opt for tarnish-resistant or coated wire to ensure durability and longevity of your necklace. Silver, gold-filled, or copper wires are popular choices.
Bead Selection: Select beads that complement the wire gauge. Larger beads work well with thicker wire, while smaller beads are suited for finer wire gauges.
Conclusion
Making a wire cross necklace is a fantastic way to create a personal, handcrafted piece of jewelry. With the right materials, tools, and a bit of patience, you can craft a beautiful necklace that reflects your creativity and style. Enjoy the process, and don’t hesitate to experiment with different wire shapes, beads, and chain lengths to create a piece that’s truly one of a kind.
Related topics:

